


 |
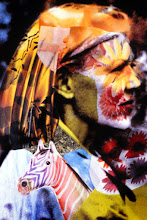
| Scratched first, then the color was enhanced with markers. |
First, for the scratching activity (the photo above with the leaded glass), dip a processed print in lukewarm water about a minute, blot, and use scratch tools or even sandpaper on the parts you wish to lighten or remove. If the emulsion hardens too quickly, just run warm water over the picture again.
If you want, add color back in with markers, watercolors, or inks. This project is a great way to re-work photos that contain distracting elements! Here's a link to another scratched example.
Next, bleaching the print is best done on a commercially-printed photo, since rinsing afterward is a good idea. Inkjet prints would run with a water rinse.) Try a bleach pen if you want to write words or numbers or symbols. Then wipe with a damp paper towel, rinse under water, and dry. Young children should not attempt this project.
 |
| Shot inside an old house to "frame." |
BUT, here's another way to use household laundry bleach with photos! Mix a solution with half water, half Hilex in a tray. Dip part of the photo in and watch the colors change! You can even protect parts of the photo with a wax resist product first if desired, and then dip the entire thing into the tray of bleach solution. See example below. Also see "Dodg" at this link.
 |
| Partially bleached in a tray. |
 |
| Of COURSE it works with either horizontal or vertical strips, even angled pieces! |
 |
| Markers are just so easy! |
Thanks for viewing this post! I appreciate it.


A few months ago was cleaning out my boxes of stuff and came across quite a few out of focus photos and have been messing with them -- you are giving me more fun ideas :)
ReplyDeleteThanks again, Meera, you are kind to comment!
ReplyDeletejoking very good!!
ReplyDelete